WARNING: Adding our stones to items is highly addictive. HIGHLY. ADDICTIVE.
We find the easiest way to pick up stones and place them is using our wax pencil picking tool.
We’ve used other tools, but we believe these are the easiest and best to use. Because they have a waxy centre, you need to take extra care when sharpening. We use the ‘Elf’ sharpener available at Kmart in the cosmetics section. It seems to work perfectly. When working with smaller sized stones, sharpen the pencil to a nice point, and when working with the larger sizes, allow the tip to be flatter and blunter. (This gives a larger surface to stick to the bigger/heavier stones.)
So …. Let’s get started!
Firstly, you need to make sure your project is clean. It needs to be clear of dirt, grime, grease etc, so make sure you wipe it over with either acetone or isopropyl alcohol.
Using the loaded glue syringe, add dots (or a small line) of glue onto your project. Now use the wax pencil to pick up a stone. Place the stone into position and very gently press down. It doesn’t take much, just a gentle press and move on to picking up the next stone.
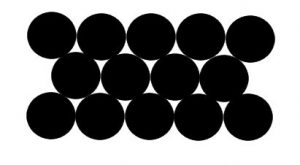
We mostly lay our stones in an offset pattern. We like maximum bling, so placing our stones closely together gives us the desired effect.
Lay one row of stones. Then directly below start a second line. Place the second row of stones offset to the top row as shown in the picture above. And that’s it! The stones meld in together for a beautiful result.
It’s probably best to start with a smaller easy project first and by the time you’ve finished that you’ll be champing at the bit to find and start another … But we did warn you – it is very addictive. (And you thought the colouring in craze was fun!)
Everything you need to start your own project is available from our online store and of course head to Kmart to source all your items!
Categories: Learn How To


Leave a Reply
You must be logged in to post a comment.